
Enhancing PSO PC's Graphics

Enhancing PSO PC's Graphics
This is a guide that will show you how to improve the graphical quality of PSO PC by enabling special effects in your graphics driver. This guide does not require you to modify the PSO client in any way, as these effects are generated on-the-fly by your graphics card. The better your GPU is, the more effects you can apply to enhance PSO's appearance. This guide will show you how to add antialiasing (AA), anisotropic filtering (AF) and vertical synchronisation (vsync) to PSO to enhance its graphics.
This guide will walk you through how to enable these effects with an nVidia GPU, but the steps are essentially the same if you have a graphics card made by ATI/AMD:
The main difference is that the name of each setting will differ between nVidia's and ATI/AMD's drivers.
If you have an nVidia card, it isn't actually possible to activate the best settings for PSO by using the regular nVidia Control Panel, as the best options are hidden. This is most likely because modern games will run in slow motion with such settings, and nVidia doesn't want to deal with customers complaining about their games having poor performance. PSO is old enough that we can use the best settings with no performance penalty, though, so we can use a special tool called nVidia Inspector to let us access them.
You can currently get nVidia Inspector from the author's website here.
As of March 2014, the current version is 1.9.7.2, and it's designed to work with nVidia's graphics driver 320.xx or newer (but it might still work with older drivers, as long as they're at least version 256.xx).
Extract nvidiaInspector.exe and the other files to a folder of your choice, then run nVidia Inspector. (You'll need to run it as an administrator under Windows Vista/7/8.) You should see this window, which describes the specifications of your graphics card:
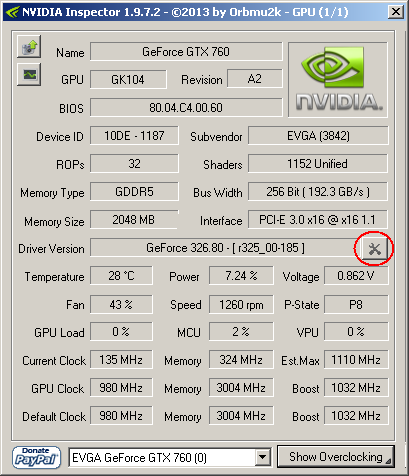
Click on the wrench icon next to the Driver Version field (circled in red) to open the profile manager, and then you'll see this window:
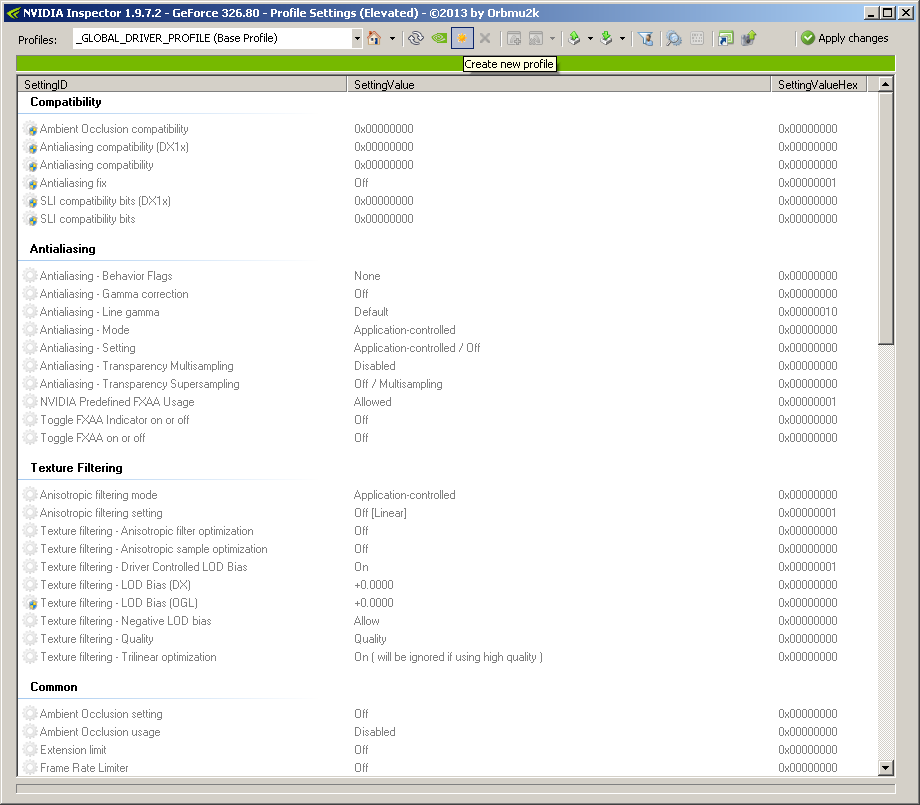
The Global Driver Profile lists the settings your GPU applies normally, such as to your desktop. If you click on the drop-down list you can see all of the pre-defined game profiles nVidia has in its driver. If you search the list or scroll to the P section, you'll see PSO2 and PSU are listed, but PSO isn't. As such, click on the Create new profile icon to create a new profile so we can add one for PSO:
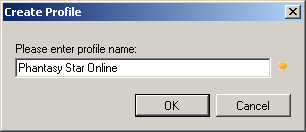
I suggest you name the profile Phantasy Star Online. ;)
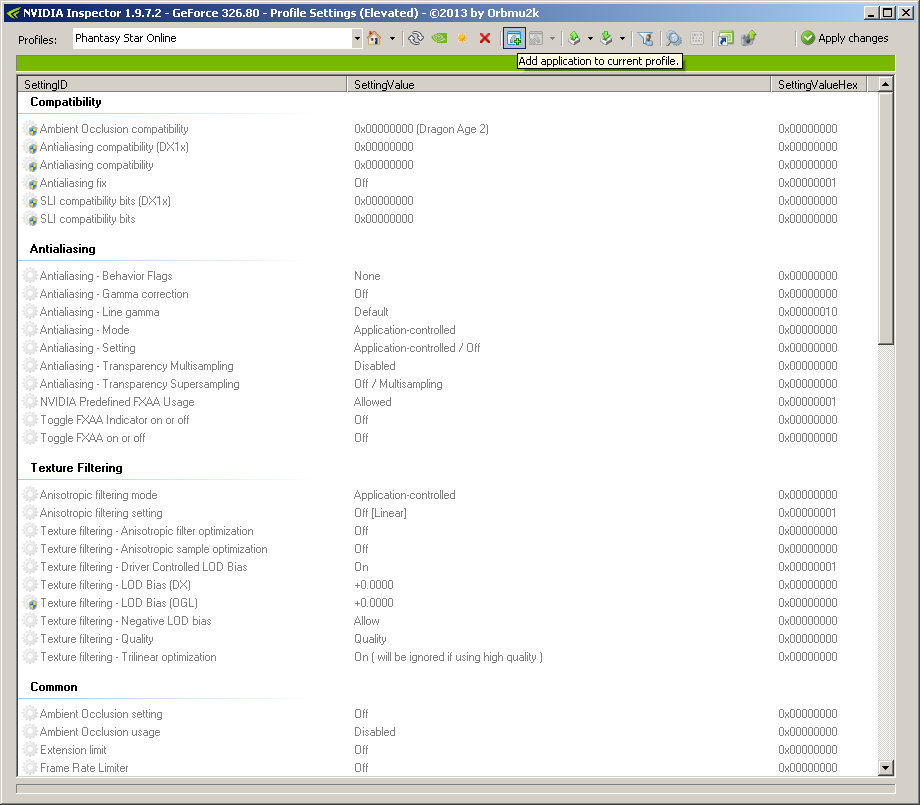
Now we need to associate a program with the profile we've created so that the graphics driver knows when PSO is running. Click the Add application to current profile button, then use the Browse window that comes up to navigate to where PSO is installed, (e.g. C:\Program Files\SEGA\PhantasyStarOnline) and select pso.exe. You'll notice a pull-down menu next to the file name field:

This option lets you decide whether you want to target any file named pso.exe (the first option) or only this pso.exe (the second option). The first option will apply this profile to any instance of pso.exe, so you could use the same profile to enhance the graphics in the full version and the trial versions of the game. The second option will apply this profile only to this pso.exe, thus letting you use different profiles for different editions of the game. I recommend the first option, as every edition of PSO PC benefits from the enhancements we're about to add, so there is no need to restrict the PSO profile to this copy of pso.exe.
Your profile should now look like this:
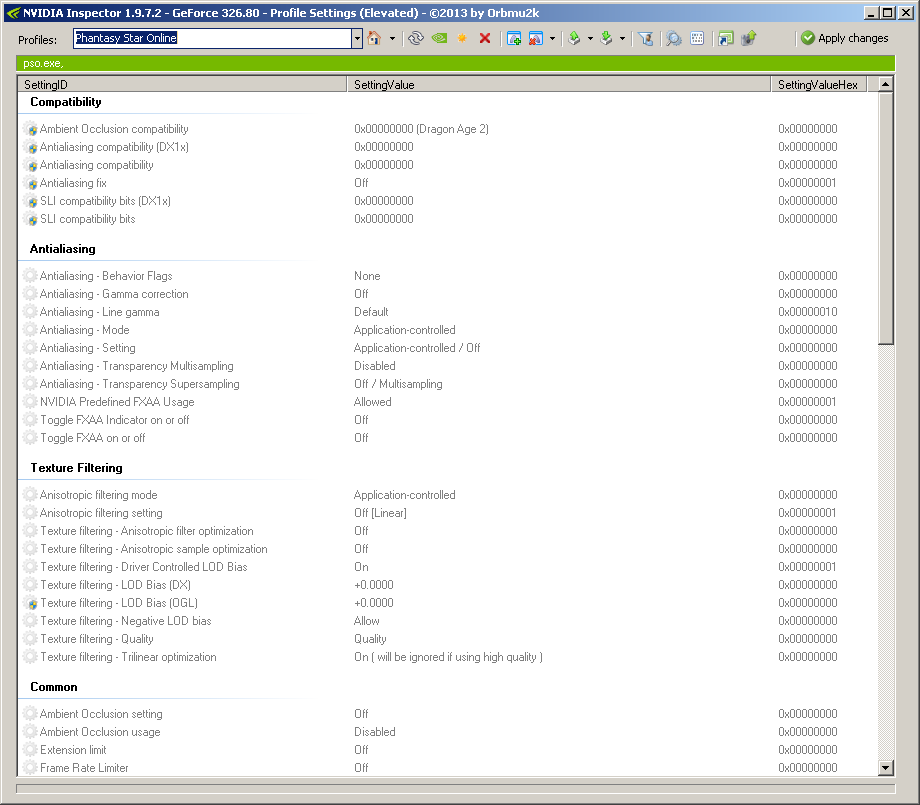
and have pso.exe in the green bar that lists which programs are affected by this profile. Now we can start adding effects to PSO. Under the Antialiasing section, go down to Antialiasing - Mode and change it to Override any application setting:
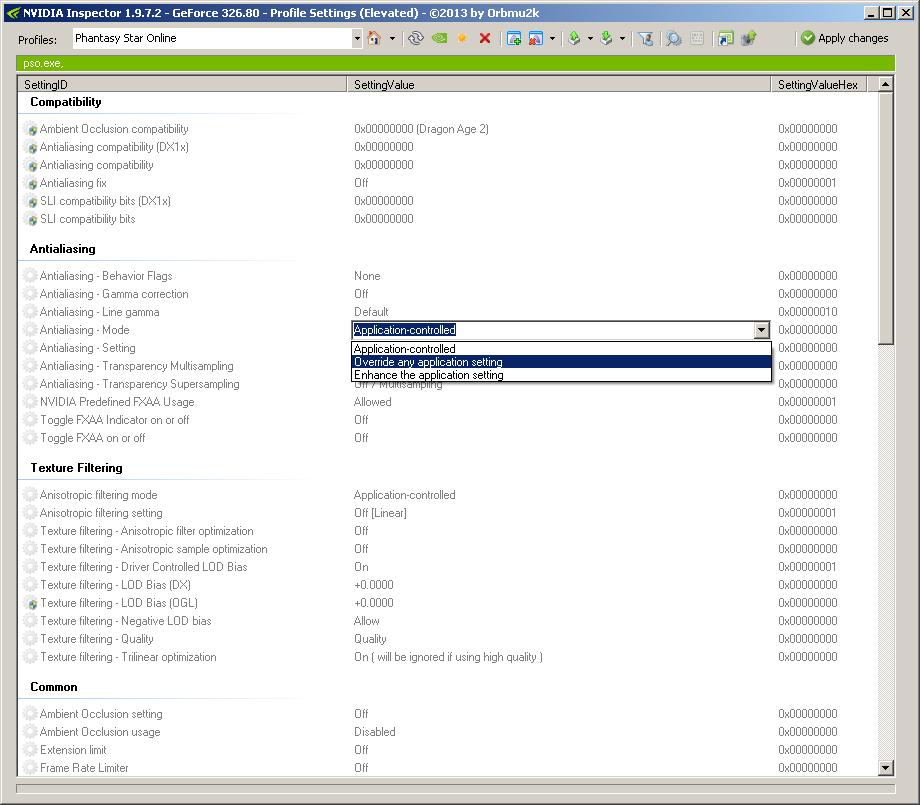
PSO is such an old game that it has no AA settings of its own, so the driver can simply force AA by itself. The Enhance setting is for newer games that have some form of built-in AA that you want to improve.
Now open the Antialiasing - Setting pull-down menu, and you'll see a slew of options:
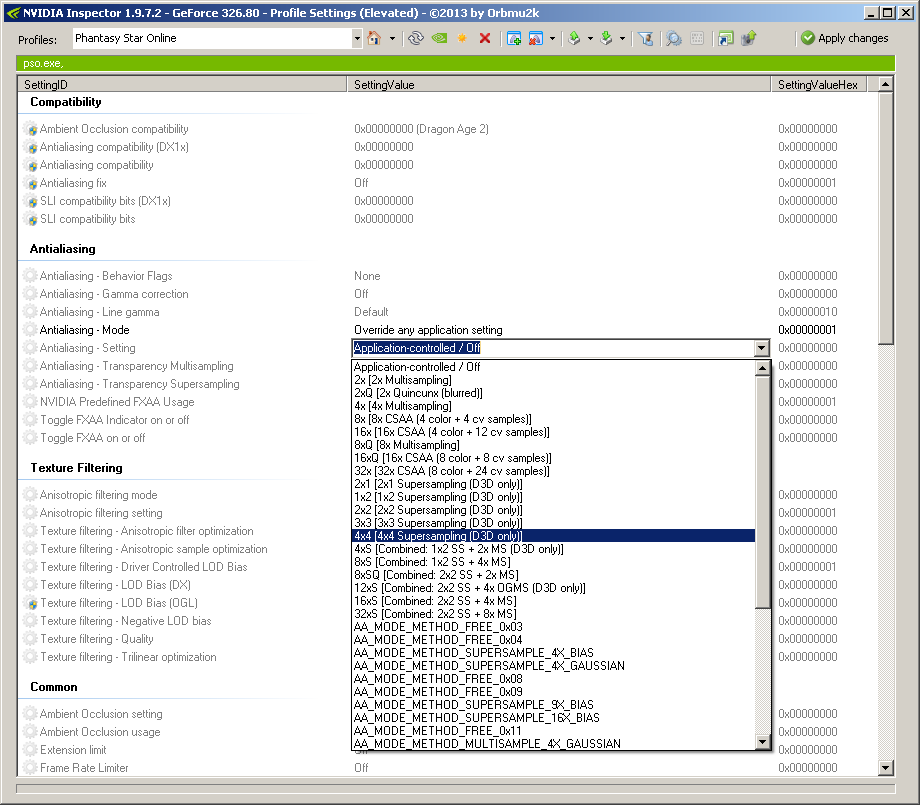
Different options have different strengths and weaknesses, but they all do essentially the same thing: they remove jagged edges (aliasing) from the image so that lines appear smooth. This is especially useful for PSO, because the game's textures are such a low resolution that aliasing is readily apparent. As for which option to select, I suggest that you select 4x4 [4x4 Supersampling] from the list, as it will deliver the best quality (and also cause the greatest performance hit). For more information about the different modes (and some screenshot comparisons), see the end of this guide.
The Texture Filtering section will let us enable AF, which sharpens textures and prevents them from getting blurry as they get farther into the distance. Go down to Anisotropic filtering mode and select User-defined / Off from the list:
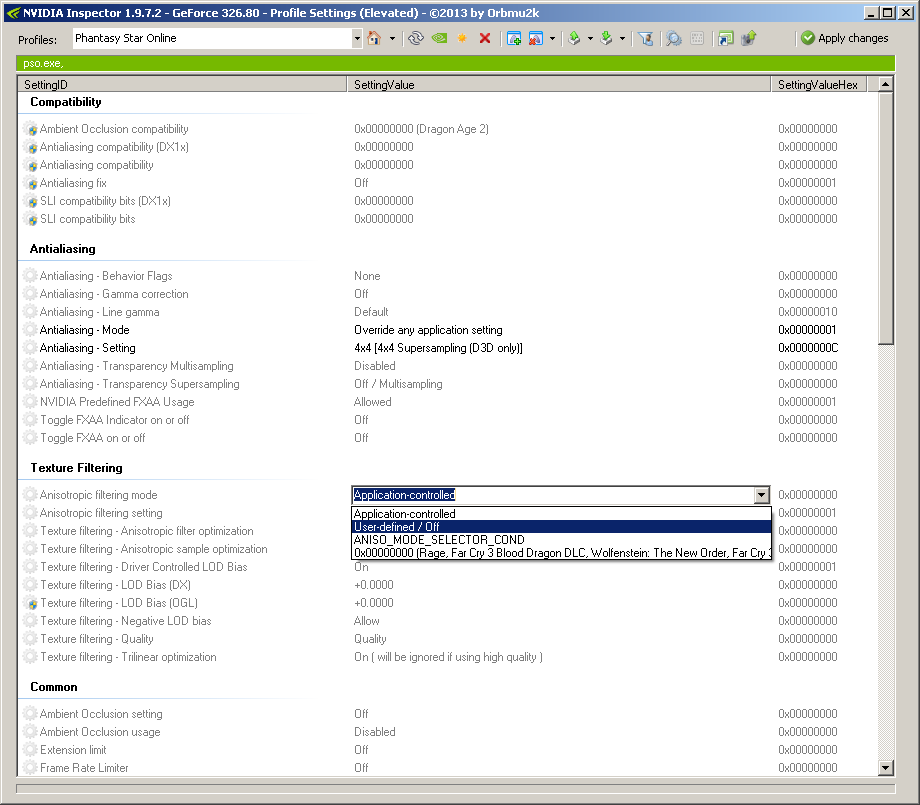
Change the Anisotropic filtering setting to 16x:
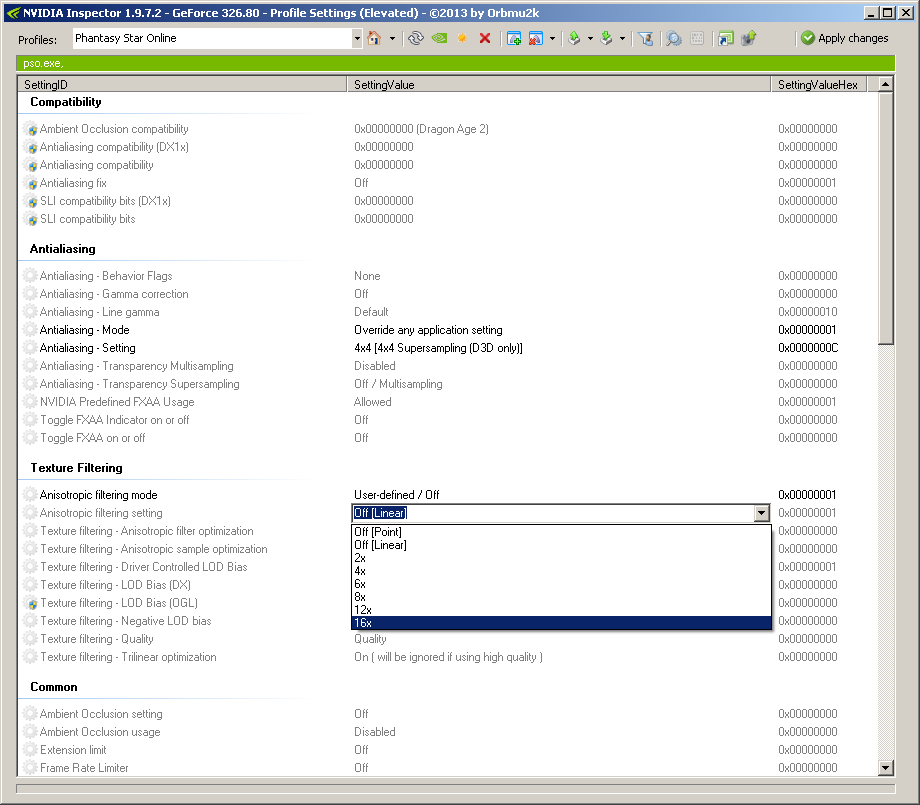
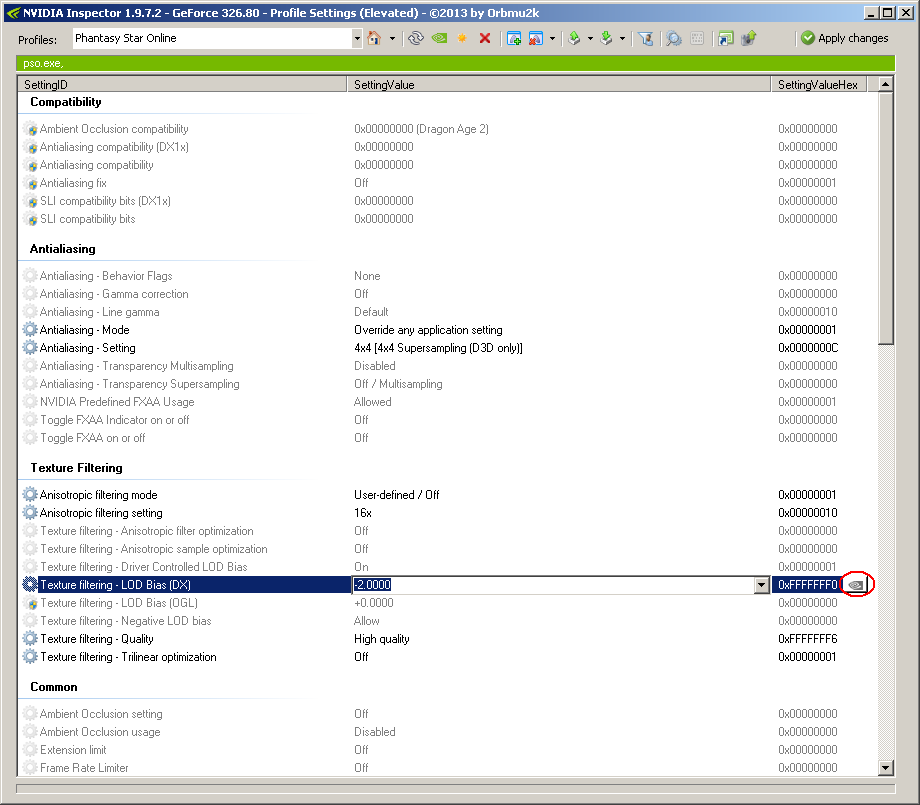
Change the Texture filtering - LOD Bias (DX) to -2.0000 (and don't select the OGL LOD bias option by mistake!):
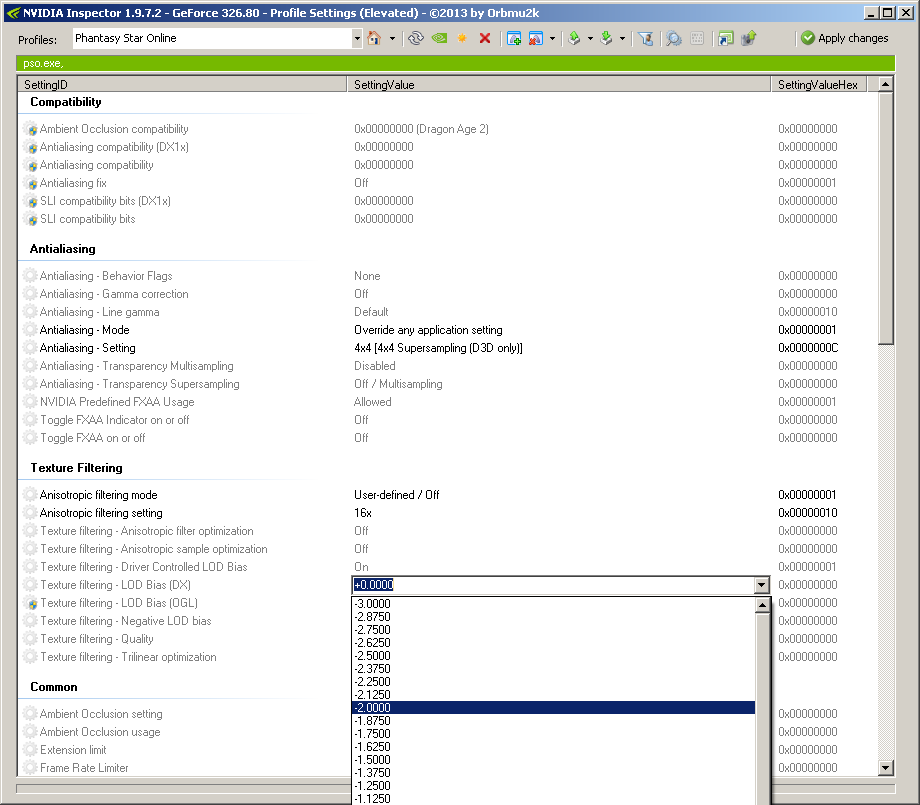
Change Texture filtering - Quality to High quality:
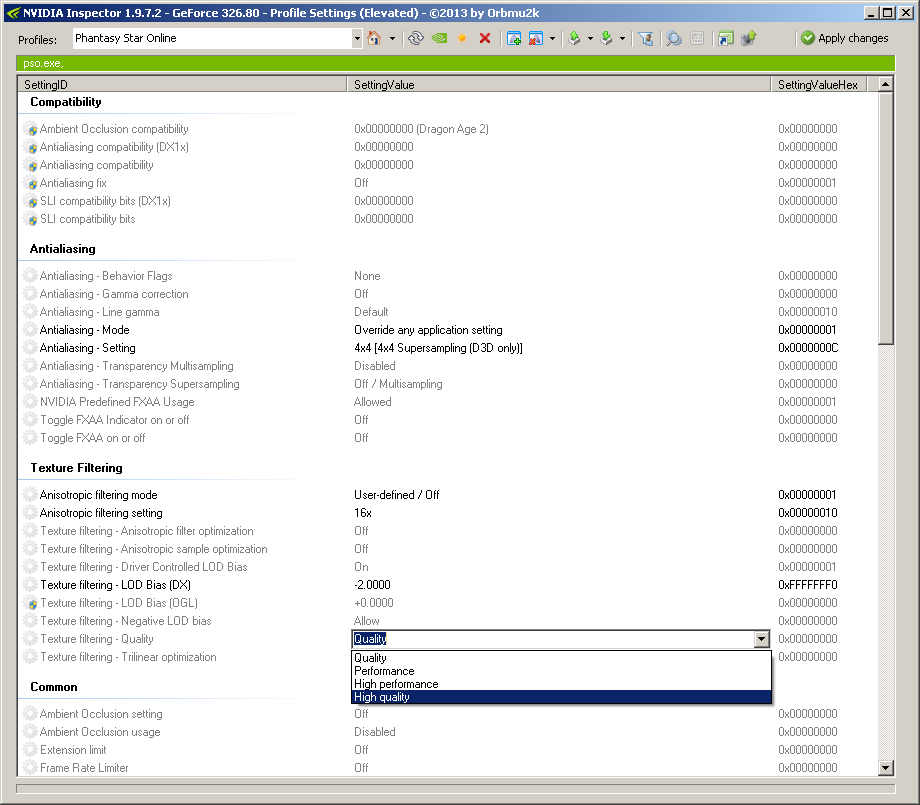
and change Texture filtering - Trilinear optimization to Off:
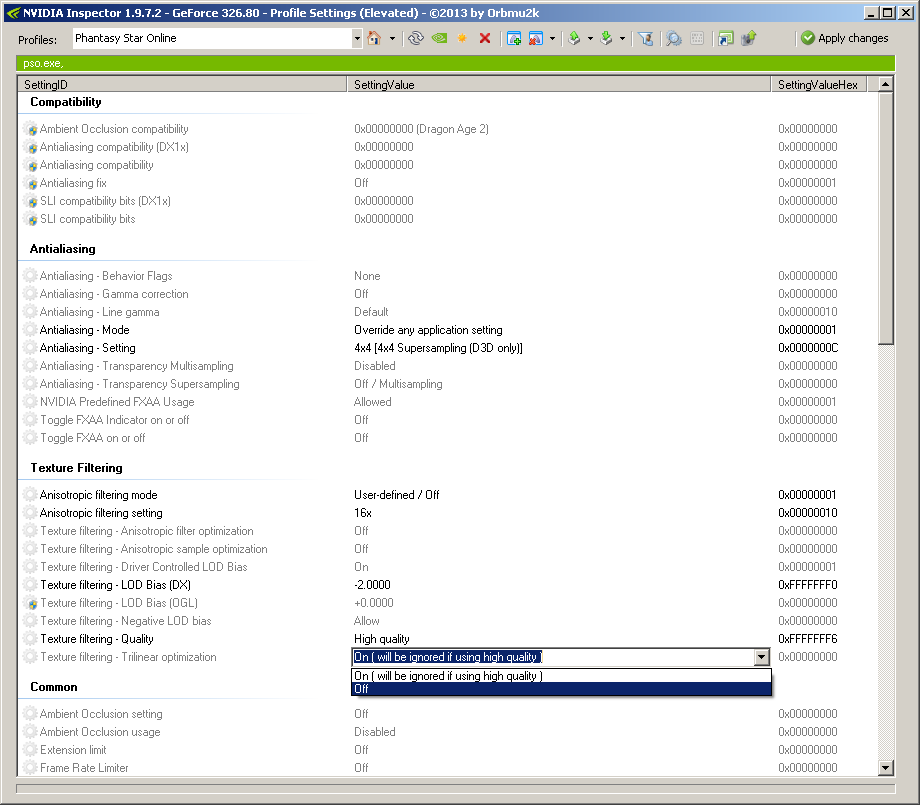
That last setting isn't technically necessary, since trilinear optimisation should automatically be disabled by setting the texture filtering to high quality.
Under the Common section, go to the last option and set Vertical Sync to Force on:
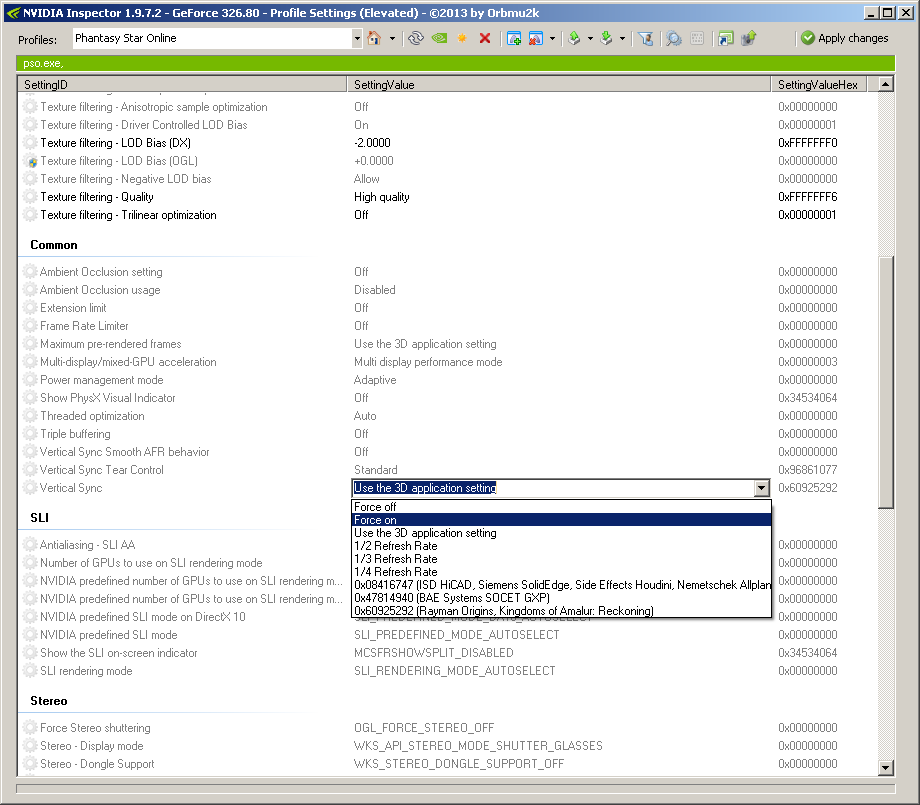
Vsync is a function that prevents "tearing" of the image during gameplay. If your GPU is more powerful than the minimum requirements to play the game (which is pretty much guaranteed in PSO's case if you have a modern GPU), your GPU will generate video frames faster than your monitor can display them, which causes the on-screen image to not look contiguous during motion.
With PSO you can even see this problem during the SEGA and Sonic Team logos that appear before the title screen: horizontal lines will appear on the screen as the logos fade in and out, because your monitor is simultaneously displaying different parts of different images where the fade effect isn't at the same intensity (so the top half of the screen may be faded more or less than the bottom half of the screen, thus causing a line or "tear" where the two different images are joined). You can also easily see tearing when you're on Pioneer 2: simply run to the left or right (so the camera is forced to pan across the background), and you'll see tearing across the background objects (particularly the door to the Ragol teleporter, assuming you're far enough away from it to keep it closed).
Vsync fixes these artifacts by forcing the GPU to wait to generate the next video frame until the monitor signals that it is ready to display the next frame of animation. This ensures that all frames line up exactly and prevents the monitor from trying to display multiple frames at once. The penalty for this is that the maximum frame rate of the game gets limited to 1/2 the refresh rate of your monitor. Since most monitors operate at 60 Hz, using Vsync limits your game to 30 fps. This can be a problem for newer games that normally run at 60 fps, but since PSO runs at a fixed frame rate of 30 fps anyway, enabling Vsync has no penalty in PSO. =D
The last item you'll want to change is in the Other section. Select the Maximum frames allowed option, which has a default value of 0x00000002, and change it to 0x00000000. The pull-down menu won't have any options in it, but you can click in the field to get a blinking text input cursor, press Backspace to delete the 2, and replace it with a 0:
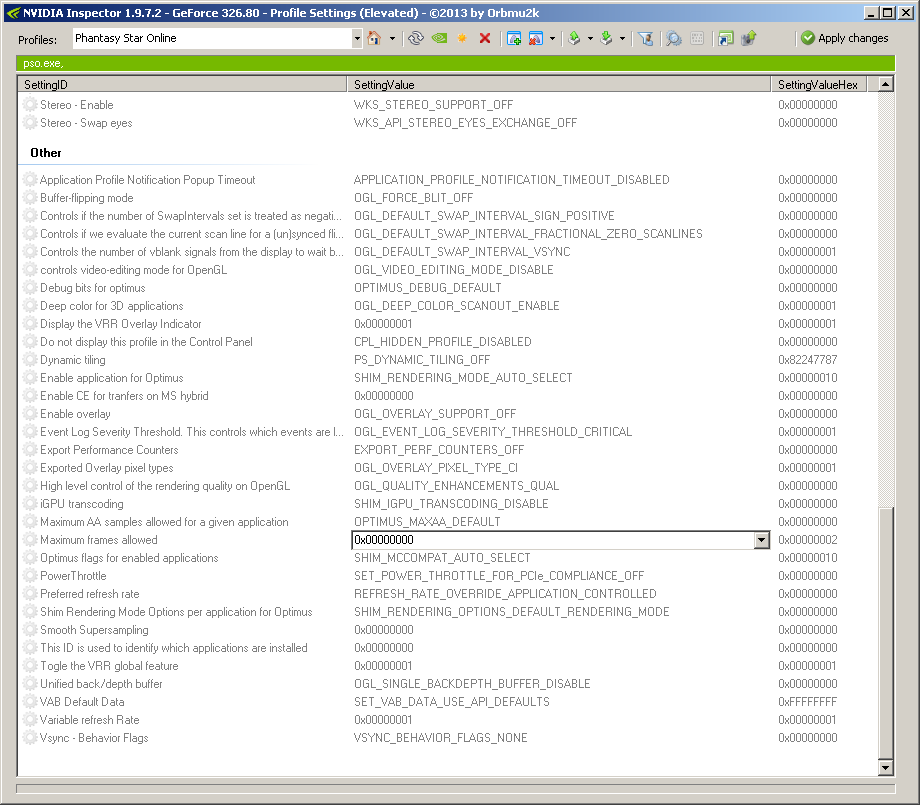
Notice that the field says 0x00000000, but the value to the right still says 0x00000002. Press the Enter key to accept your new value, then click on some other setting so that you can see the Maximum frames allowed option has been activated:
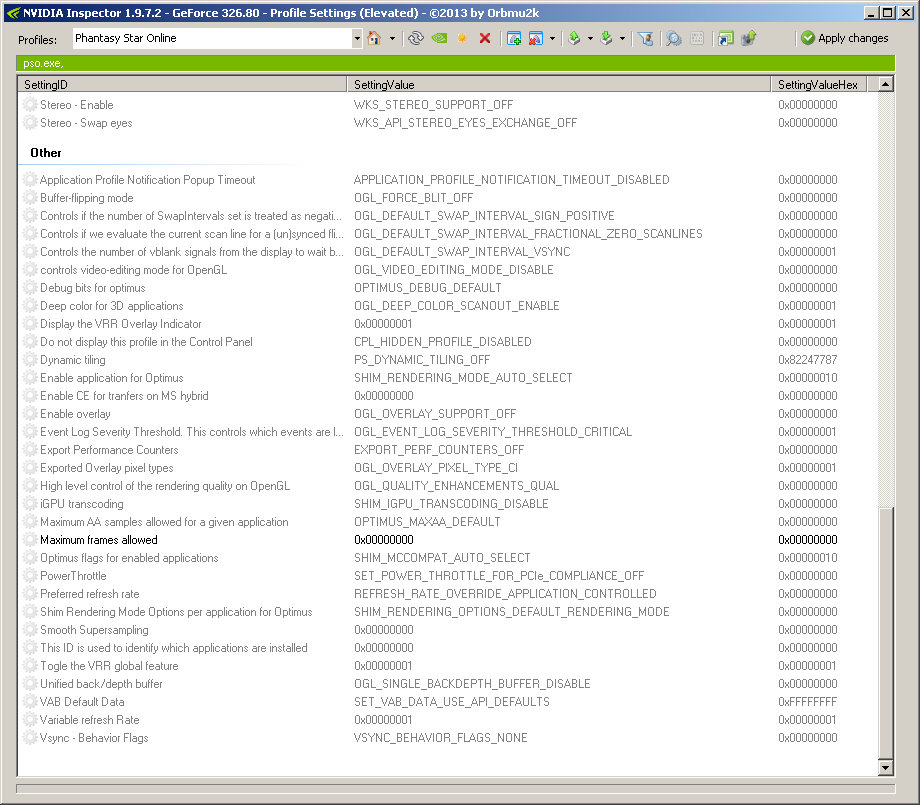
I suggest setting this option because when I configured a PSO profile through the standard nVidia Control Panel, this option got set automatically. I don't know what this setting does, but I assume the drivers set it for a reason, so I continue to use it in custom profiles for PSO.
Now for the final step: Click Apply changes!
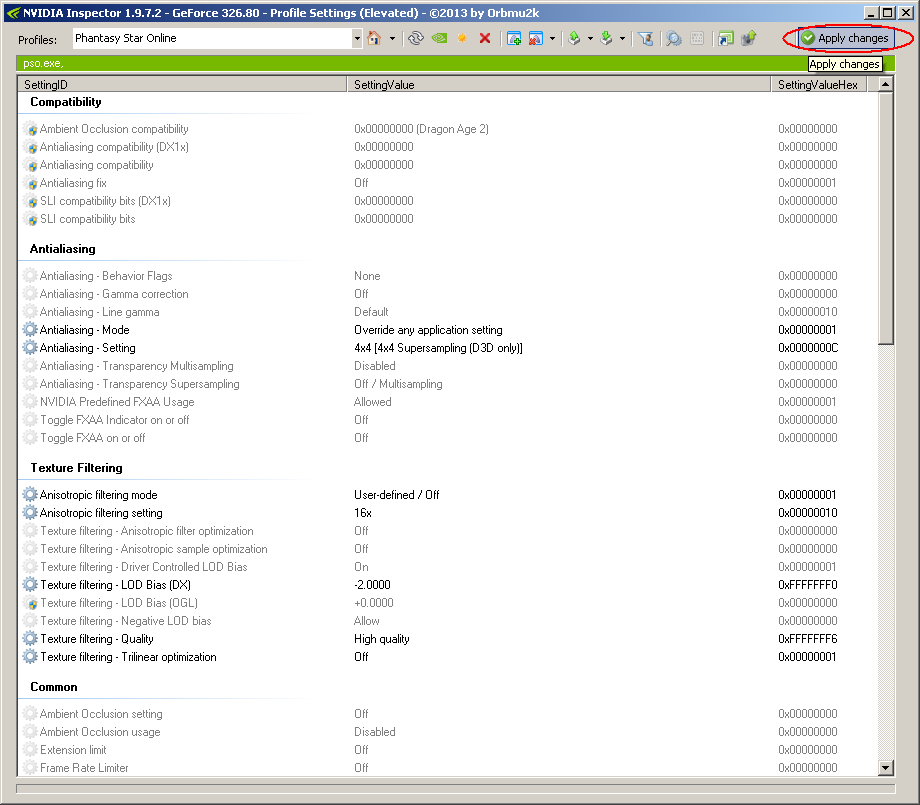
Nothing saves until you do that. ;) Once that's done, you can close the nVidia Inspector windows and try PSO with the new settings! The driver for your GPU is always running in the background, so you don't need to run any extra programs to apply these settings to PSO, even after you restart your PC. The graphics driver will notice whenever you launch pso.exe and apply these settings to PSO automatically.
It's also worth noting that the profile you've just created will show up in the regular nVidia Control Panel, but you shouldn't try to modify the profile from there. You'll notice that the antialiasing setting in the NCP will say Custom, because you set an option with nVidia Inspector that is hidden in the NCP. If you change the AA setting in the NCP and apply the changes, you won't be able to restore the custom setting unless you open nVidia Inspector again and use it to set the AA mode.
The 4x4 Supersampling antialiasing (SSAA) option provides the best overall quality, but it also has the steepest performance cost of all the modes. SSAA works by rendering the entire scene at a higher resolution and then scaling it down to the desired display resolution, which allows the GPU to average the colour of each pixel in the image to reduce aliasing. Using 4x4 supersampling means that you are effectively rendering PSO at 16x its normal resolution, so the game needs 16x as much VRAM as normal. Note that VRAM is the RAM on your graphics card, not your system RAM. (You can see how much VRAM your GPU has in the main nVidia Inspector window.) One of the reasons the Dreamcast version looks better than the PC version by default is that the Dreamcast applies 2x supersampling to its graphics. Using the power of a modern graphics card, you can not only match but surpass what the Dreamcast can do with PSO. ;) You will probably need a video card with at least 1GB of VRAM in order to use 4x4 supersampling, and if your GPU has less memory than that, you may want to use 32xS mode instead.
All of the xS modes are "hybrid sampling" AA (HSAA) modes that combine high quality supersampling AA with lower quality multisampling AA (MSAA). Multisampling essentially only performs AA on the edges of textures, so it has a much lower performance cost than supersampling does (and comparatively lower quality). Multisampling is the most common method of adding AA to modern games, because the performance hit of supersampling is too high if you want to play a game at 1080p with 60 fps. Supersampling is only practical for PSO because of its low framerate and resolution. If you have an older graphics card, the 32xS, 16xS, 8xSQ, and 8xS modes will all provide an excellent balance between quality and performance by first applying 2x or 4x SSAA and then adding 2x, 4x, or 8x MSAA to improve the quality further. (For instance, I was able to apply 8xS HSAA to PSO with a GeForce 6800 AGP card with only 128MB of VRAM, so a card with 512MB of VRAM should be able to apply 32xS HSAA with no problems.)
Note that if you use HSAA, you do not need to set the Texture filtering - LOD Bias (DX) option, because HSAA will automatically set the LOD bias for you. If you want to switch to HSAA, simply select the LOD bias option and click the nVidia eye icon on the right side of the screen to reset the LOD bias to its default value:
If you want to learn more about the LOD bias and why you need to change it for SSAA, read this page.
The MSAA options at the top of the AA list are simple MSAA modes that do not apply any SSAA, and these are the only modes that you can access from the normal nVidia Control Panel. As mentioned previously, MSAA saves significant computing resources by only performing AA on the edges of textures, which means that textures that include transparent components won't get fully antialiased. For example, consider a chain-link fence: MSAA will only perform AA on the outside of each "O"-shaped link of the fence, while the inside of each "O"-shaped link will remain aliased. To alleviate this problem, you can enable the Antialiasing - Transparency Multisampling or Antialiasing - Transparency Supersampling options to perform an extra "layer" of AA on textures that have transparency. As with the regular AA modes, Transparency Supersampling (TRSSAA) results in higher quality and lower performance than Transparency Multisampling (TRMSAA). If you are using the regular SSAA or HSAA modes, you don't need TRSAA, though, because both SSAA and HSAA are already supersampling the entire image, thus removing aliasing on everything. PSO is compatible with MSAA, but the only reason to use it is if your performance suffers when using SSAA or HSAA.
The CSAA modes are special Coverage Sampling AA modes designed by nVidia to improve the quality of MSAA without incurring the performance penalty from using SSAA. CSAA is a useful mode for modern games, but in my tests I found that it was not compatible with PSO. Using it causes random flickering in many of the game's textures, so I suggest that you avoid using it.
Here are some screenshot comparisons of how PSO looks normally and how it looks with 16x SSAA and 16x AF. Place your cursor over the image to see how it looks after the enhancements have been applied. (You may want to zoom in with your browser to magnify the images.)
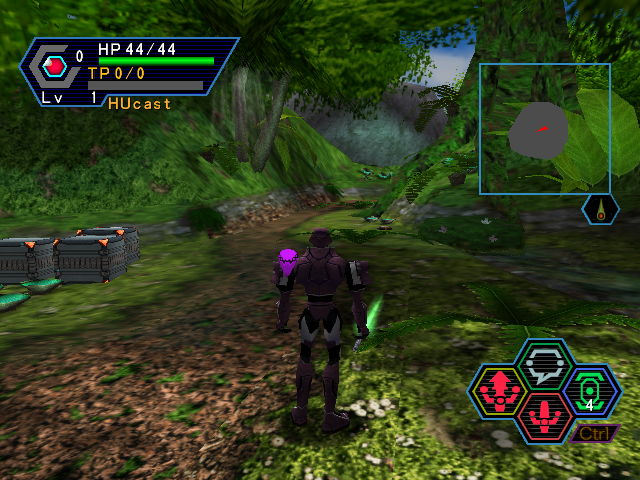
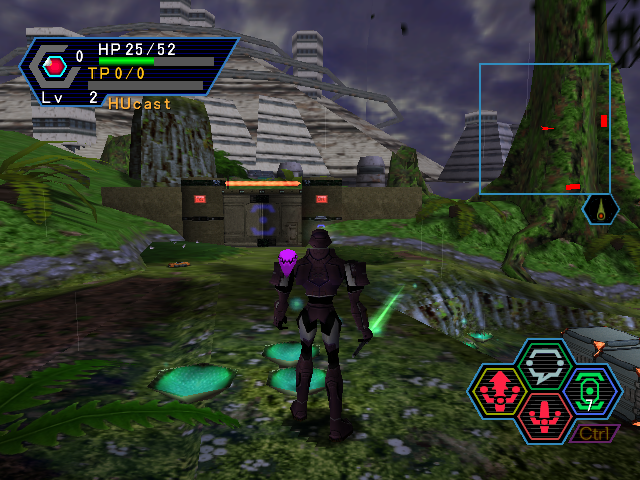
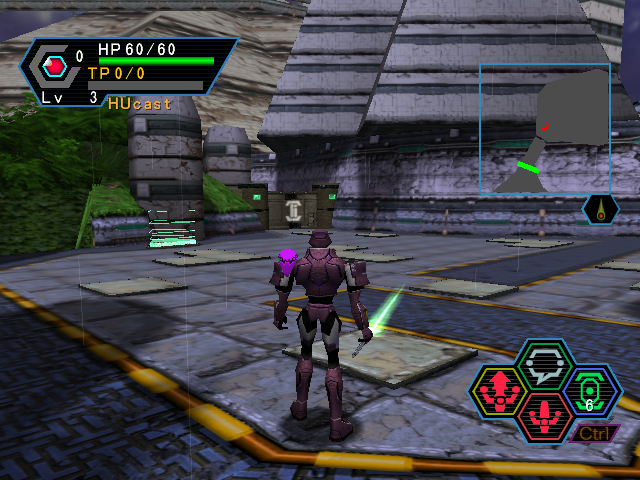
I think the last image best illustrates what AA and AF can do to improve PSO's graphics: aliasing is clearly visible around the body of the HUcast, and it's also visible along the black edges of the concrete blocks that stick up from the floor. Those jagged edges disappear completely with AA applied. The floor texture is visible only around the HUcast's feet normally, and it quickly becomes blurred as it fades into the distance, while the side of the Central Dome is also blurry. The blur on the floor and the wall disappears with AF applied.
Finally, here are some screenshot comparisons of how these same three scenes look with either 16x SSAA or 32xS HSAA. The SSAA image is shown by default; place your cursor over the image to see how it looks with HSAA. (All images have 16x AF.)
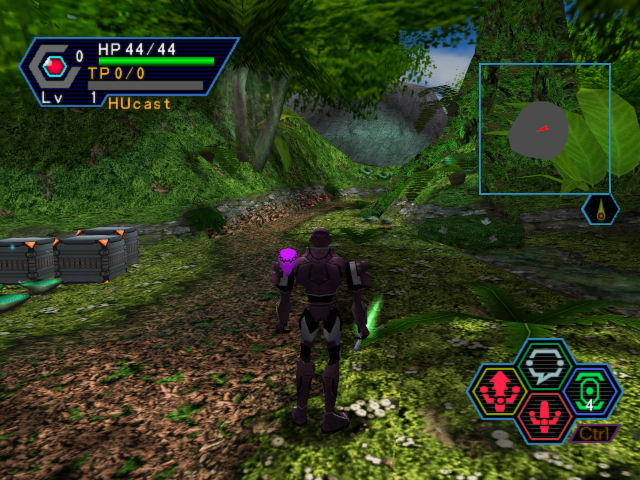
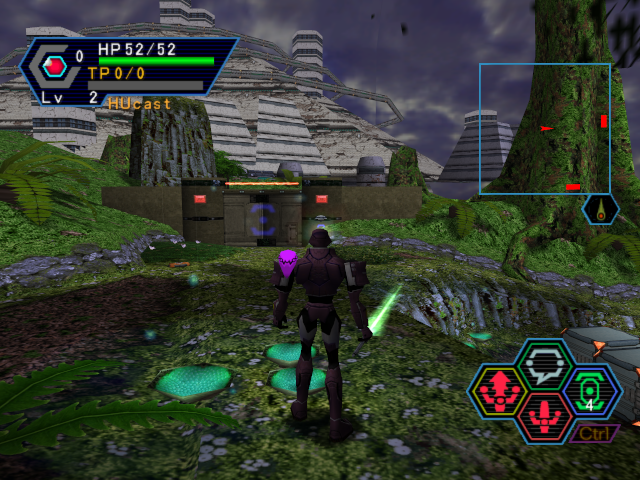
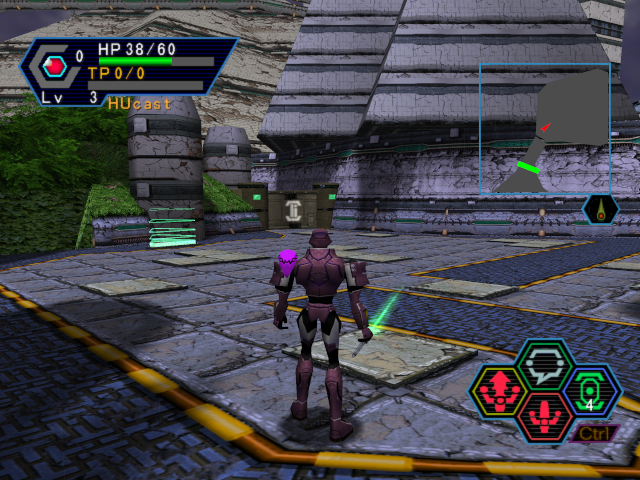
As you can see, SSAA and HSAA are very close in terms of quality, and the difference is nowhere near as significant as the difference between using AA and not using AA. In my opinion, HSAA makes the image slightly sharper, but it also doesn't remove aliasing quite as effectively: if the scene is in motion, HSAA leaves more texture shimmering than SSAA does, which is something you unfortunately can't see when looking at still images. Now that you know how to apply these settings, you can test for yourself if you so desire. ;)
Enjoy your now beautiful PSO!
Thanks go out to NaturalViolence for explaining these settings clearly. If you want to learn more about them, you can read up on the various discussions he's had about them, and you can also check out his site. There is also a topic on my forum about this guide, which you can find here.