



General Tips

Bestiary

Area 04
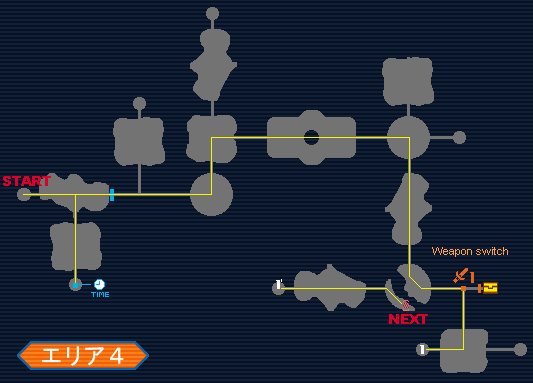
After clearing the first room, proceed into the hallway and break the rocks to enter the second room. Once the enemies are dead, the weakest player should proceed into the next room while all others backtrack to the previous room. Break the rocks in the next room to reveal the timer switch, hit it, and then run back to the previous room and go right and through the door before the timer period ends and it closes. If you don't make it in time you'll have to run all the way back to the switch to try again. Ignore the enemies that spawned in the first room, pop up the Symbol Chat menu so you don't get slowed down by them if they're nearby. Once you make it through the door, proceed past the stompers into the next room. In Challenge mode, there is one basic strategy to not getting hit by the stompers:
When you approach a set of synchronized stompers, wait to cross until they plunge down, then hold up so that you walk against them, in place, as they are rising up. As soon as they have moved up enough for you to pass by you will begin to run past them, and you'll make it past before they come down again. If you don't do this but instead try to run past while they are in the middle of the countdown sequence, you're likely to get turned into a pancake, so be careful.
Clear the third room and once in the fourth, a player should wait on the button long enough for the Force to get behind the barrier, then the player should carry on into the next room. The Force should hit the large button and then collect the items from the boxes, then join the rest of the party in the next room.
In the room after the long room ignore the computer, but both Hunters should procure the Handguns from the two boxes. If you're a HUcast you can already use a Handgun. Shoot the button above the door to open it so the Force can collect the items inside, then proceed to the next room.
Follow the map until you reach the hallway with the stomper and button, drop any spare weapon on the button so the Force can collect the items. Once that is done the Force should pick up the weapon as he leaves. In the next room destroy the rock to the left of the laser fence and hit the switch to open the laser fence to the Healing Ring. The Force should attempt to conserve his TP so as to be just running out at this point, the Hunters and Ranger should not use the Ring unless they have very low HP. All players should take the warp and clear the final room, then carry on to the next area.

Area 05
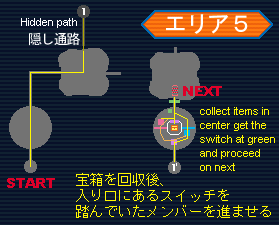
In the second room ignore the enemies, instead carry on to the left and proceed through the fake wall and take the warp at the end of the path. In the next room one player should wait on the switch on the right, while one moves past the fence. Then activate the button near the door to let the player who passed the fence to collect the items. Once the items are collected, the player should activate the green switch as shown on the map and then step on the button marked pink on the map to let the waiting players through. Proceed to the next area.

Area 06
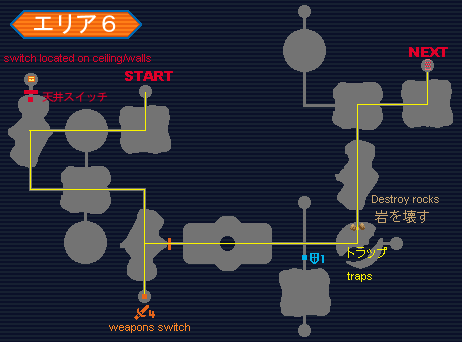
In the third room shoot the button above the door to the right so the Force can procure the items.
In the fifth room is the first item button, you must drop 4 weapons in the room to open the door. Note the weapons don't have to be dropped exactly on the button to open it. Carry on past the long room and have the HUcast/RAcast shoot the traps and break the rocks after the 4-way intersection. Continue on to the next area.

Area 07
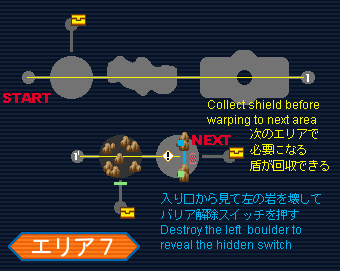
The Force can proceed through the fake wall to the left in the first room to procure the items if desired. Proceed to the warp after the long room, then move past the dark room with the rocks and break the rocks at the far end to open the door the next room. It is not necessary to collect the items. In the next room destroy the traps and the rock to the left and hit the switch to open the fence. All players except the Force should warp to the next area, while the Force proceeds past the area warp and through the fake wall to collect the shields from the boxes. (These are needed for the next area, so make sure you get them.) Then the Force can warp to the next area.

Area 08
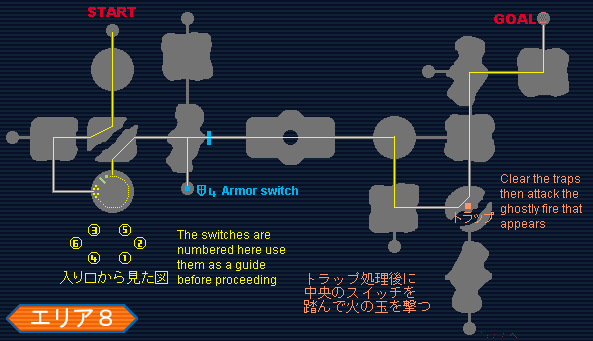
Proceed until you reach the puzzle room with six switches and fences. One player should enter the puzzle while the others step on the switches in the order shown. It's a good idea for the player inside the puzzle to call out the number of the fence he has just passed so the others know which switch to press next. Don't move from switch to switch too rapidly as if you don't stand on it for a long enough period of time the player inside the puzzle won't have time to cross the fence. The player inside the puzzle should continually hold up on their joystick so they walk in place against the fence until it opens. If you're coordinated and memorize the button locations you can do this puzzle almost instantly, otherwise it can take quite a bit of time. Once the player has passed the sixth fence he should step on the button (it does not pop up so tagging the button is adequate) to open the left path for the other players to proceed through.
Continue into the next room and clear it at which point you'll be faced by the 4 shield button. Armour does not count, only shields, so hopefully you did get the shields from the boxes in the previous area. Once four have been dropped proceed through the door.
In the third room after the long room you get to play a little game of "Shoot the Flame Garment." All capable party members should equip Handguns and once someone steps on the button, the lights will go out and a blue flame will appear (it looks like an Aura Field.) Shoot it repeatedly and it will disappear and appear somewhere else. Shoot it again to repeat the process. Eventually it will change from an Aura Field to a Flame Garment, but the procedure is the same, keep shooting it. Once the Flame Garment appears in front of the door to the next room, the next time you kill it will end the game and open the door. Follow the map to the Goal, and you've cleared Stage 2!