


General Tips
Bestiary
Area 36
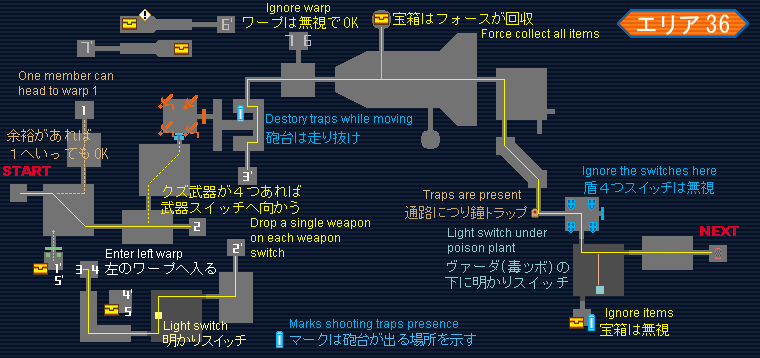
After the first room one party member can take warp 1 and get the boxes if desired, however it is not necessary. In the second room you can follow the dotted line into the next room for a shortcut, however this shortcut requires weapons to be dropped on buttons. If the first two rooms do not have enough spawns to drop enough weapons for the shortcut I recommend not even trying as you may waste time clearing the third room for no reason. If you don't get the required weapons, take warp 2 and clear the enemies, then hit the light switch in the next room. Afterwards be careful in the L shaped room, I believe there is a Gizonde Popup Trap in it at the bend. Move on and take warp 3.
After taking the warp you'll enter the room that the shortcut would have led you to, you can collect the boxes but beware of the Popup Traps that shoot Foie if you choose to do so. Proceed to the next room. In the long room I again recommend the Ranger collect the boxes rather than the Force, but you can decide who is more useful for which duty.
Three rooms later ignore the buttons that require items and keep moving. (In the hallway before this room is a Jar Trap, make sure nobody gets hit by it.) Hit the light switch and clear the final two rooms, ignoring the item room with Popup Traps, and move to the next area.
Area 37
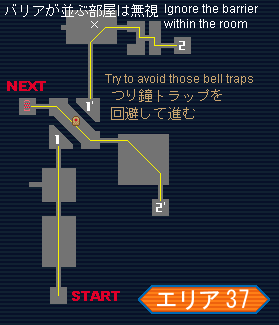
This area is pretty straightforward. In the room with Jar Traps it's easy to avoid them, just walk between where they are hanging and proceed to the next area.
Area 38
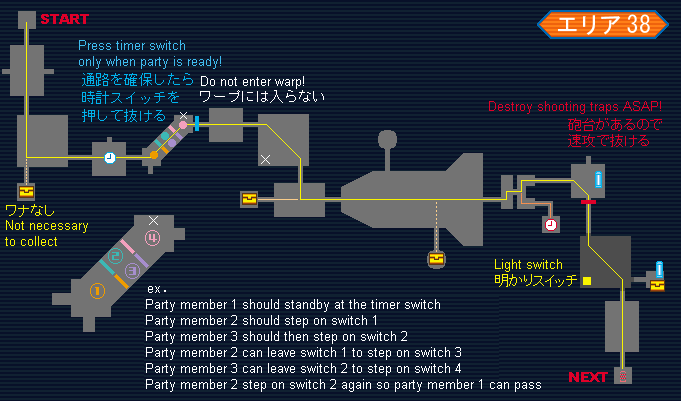
In the fourth room you'll see a solo timer switch, one player should wait next to this switch without pressing it while the other players move into the next room to prepare for the puzzle. The map tells you how to clear the puzzle but I'll explain as well.
This puzzle can be completely very quickly if you set up in the way shown above and on the map and don't do things out of order, if you get confused and mess up it can take a very long time to do this properly, so pay attention and don't waste time on it. If someone gets stuck there are warps to allow you to backtrack and try again, but you'll waste quite a bit of time if this happens, so do it right the first time. ;)
Collect the boxes in the long room and afterwards at the intersection Player A should go right while the others go left and wait by the red door. Player A should hit the timer switch, then run to the red door. As soon as the switch is activated it will summon a Popup Trap next to the door, it is imperative that the other players destroy it before moving into the next room. If Player A gets hit by it he won't make it through the door before the time expires. Hit the light switch in the next room, then move to the final room and into the next area.
Area 39
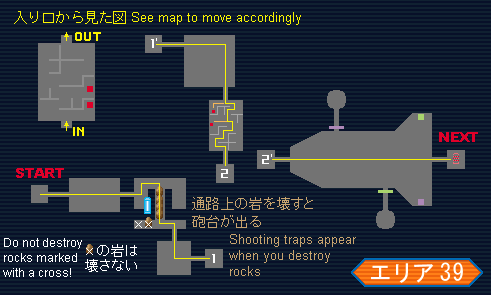
In the second room destroy the rocks to move onward, but beware of the Popup Traps that appear when you destroy each rock. A Mechgun helps quite a bit, a Hunter can destroy the rocks with it and it will allow him to blast the Traps as they appear. All party members should move along the path as each rock is destroyed to try to avoid getting killed by the Popup Traps. Be sure not to kill the rock with an X on it on the map. Move on and take warp 1.
Clear the room after the warp and move into the next one which contains a laser fence maze. Hit the two laser fence switches on the right marked in red on the enlarged map of the room, which will allow all players to clear the room as well as allow the Ranger or Force to collect the boxes. Take warp 2, clear the long room, and move to the next area.
Area 40
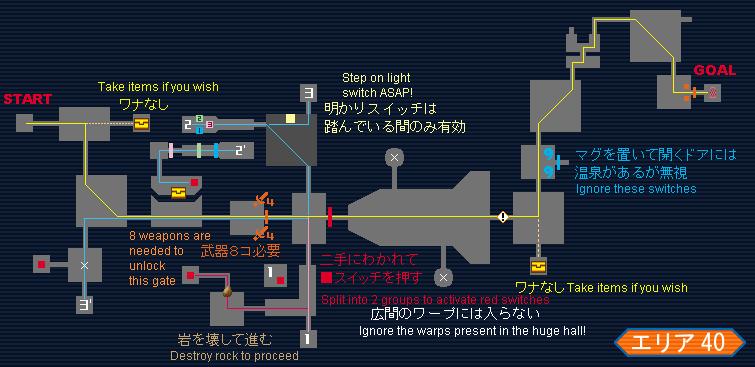
Don't bother with the items after the first room, but instead move onto fourth. Remember I told you that you needed to save weapons? Here's when you need them. Drop four (4) weapons on each button to open the door. If you didn't save enough weapons the team will have to drop some of their equips because you are required to open this door. Drop your least favourite weapons if you have to discard the team's equipment. (The Force should be ready to sacrifice his Rod if absolutely necessary, but don't leave a party member without any weapons unless absolutely necessary. Being prepared for this is highly recommended.) After you clear the next room it is necessary to split up into two teams to hit switches to open the 4p door.
For the team that goes right (following the pink path on the map):
Clear the enemies in the L shaped room, then one player should take warp 1 and activate the first switch, then take warp 1 again and move back into the room with the 4p door and take the left path. Once the enemies are clear, (they may already be) he should take warp 3 and then move left and hit the third switch, then collect the boxes. Aftewards he can follow the map back to the 4p door. (It's best if the Force or Ranger fills this role.) The second player should move into the next room, destroy the rocks, and hit the second switch, then proceed back to the 4p door. If the other team needs help, move onto the left path and help them.
For the team that goes left (following the cyan path on the map):
One player must stand on the light switch so the other can fight off the enemies, once they are clear move into the next room where you'll find three buttons and warp 2. One player must take it while the other presses the buttons in order to open the three laser fences allowing the other to proceed. Collect the boxes and hit the fourth and final switch, then move back through the fences (the other player should be waiting on button 3 still) and then move back to the now open 4p door and into the long room, where all players should meet up.
Move through the long room and follow the map past the item buttons, and take the right path at the fork. Clear the final room to stop the timer, but notice that the room after this has a 2p door. Simply stand on the buttons to open it like normal, but the timer has already stopped. Now Stage 8 is clear.