



General Tips

Bestiary

Area 31
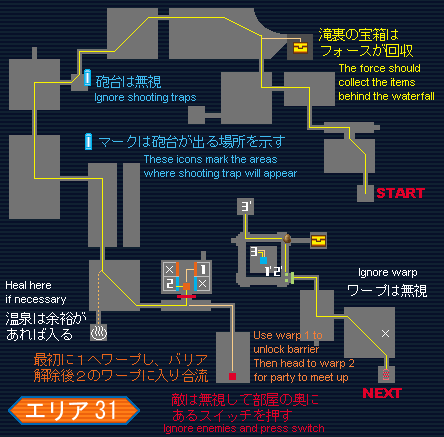
There's often something behind the waterfall, sometimes it's boxes and sometimes it's a Healing Ring, so pay attention to the maps. In this particular area, have the Ranger get the boxes behind the waterfall. In the small room two rooms later, run past the Foie Popup Traps as they don't pose a threat. Four rooms later the Force can restore TP at the Healing Ring while the other party members proceed into the next room.
All but one player should wait at the red gate, while the fourth player proceeds into the next room and activates the switch (ignoring the enemies). The remaining players should then step on the orange button to open the orange fences, allowing one player to take warp 1. (Watch out for Poup Traps that spawn during this puzzle.) Once a player takes warp 1 and stands on the button on the other side, it will open the blue fences and allow everyone else to take warp 2 to meet up. All players should then take warp 3 and proceed to the next room via the 2p door. (Don't bother with the boxes.) Ignore the warp in the last room and proceed to the next area.

Area 32
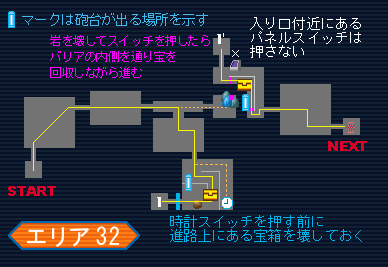
In the fourth room, the Force should run to the timer switch and activate it after the boxes have been broken. Beware of Jar Traps in this room. Once the timer has been activated the cyan door will open, and a Popup Trap will appear in the spot marked on the map. The Ranger should stay behind to shoot it so that the Force can quickly run through the maze and get through the door before it closes, otherwise he will have to run back to hit the timer switch again. As players take warp 1 and run into the next room, they will come across a large laser fence barrier that does not block the path, but shelters a slew of Popup Traps. Once a player enters the room they'll begin firing both Foie and Gibarta, run quickly to the next room to avoid getting hit and possibly frozen. If you get frozen try to break out to avoid getting killed. Kill the enemies in the next room, then proceed to the next area.

Area 33
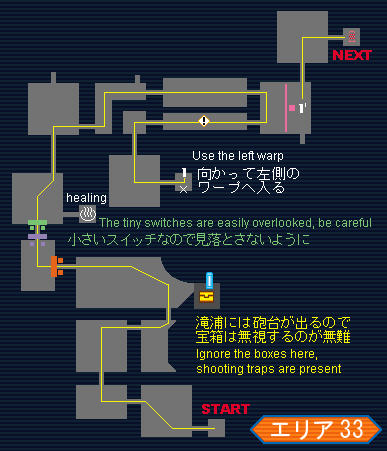
Once you reach the waterfall room, ignore the boxes as stated on the map so you don't get hit by the Popup Traps. In the next series of rooms the buttons used to open the door become extremely small, look closely and step on them to open the 2p doors. Use the Healing Ring if necessary, then move on. In the room with the laser fence you can follow the map and take warp 1 to appear on the other side and deactivate the barrier, however it is much faster to use the Ver.1 walk through walls trick to let one player backwalk through the rocks then activate the switch to let the other players through the laser fence. (This trick can also be used in Stage 4 and is mentioned in Stage 4's guide.) Regardless of how you do it, get the boxes in the room with the laser fence and rocks, then proceed to the next area.

Area 34
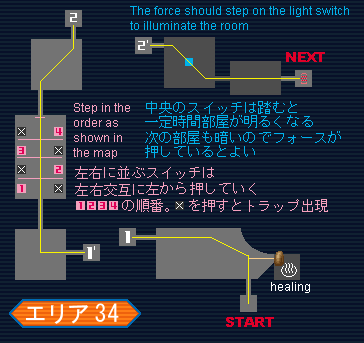
In the first room there's a Healing Ring behind the waterfall, however it's blocked by rocks that must be broken before the Healing Ring can be used. The target points on the rocks are too high to be hit with a melee weapon, so the Force must use Techniques to break them. (If the Force is too low on TP to do this, the Ranger may need to assist him.) Clear the enemies and take warp 1.
After warping clear the enemies and then proceed to the next room, where you should only hit the numbered switches to open the laser fences. Do not hit the other switches. (Note these are laser fence switches, not buttons as the map suggests by using the word "step".) Notice the pattern is alternating left, right, left, right. Move into the next room and clear the enemies, then take warp 2.
The room with the cyan switch is dark as is the room after it, but they can be illuminated with the cyan button. Once pressed the button stays active for several seconds, then it pops up and a few seconds later the room becomes dark again. The button can be pressed as many times as the party wishes, so at least one player should stay near it and be ready to press it when it pops up to keep the room illuminated. Once the room is cleared the map suggests the Force should keep standing on the button to keep the next room illuminated, however I again would submit that it might be wiser to let the Ranger do it, as the Ranger is not likely to be doing any useful damage unless he has found a good gun. (Especially if the team's Ranger is a RAmar.) However it is not completely necessary to use the button at all for the second room, as the floor is not solid but instead glows purple in the corners, making it somewhat easy to see where the enemies are even when the lights are off. Whichever way you choose to approach this room, kill the enemies and move to the next area.

Area 35
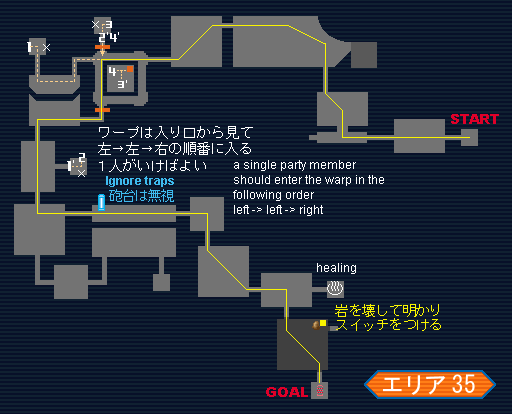
When the party arrives at the square room with the raised platform, only one person should follow the dotted line path and take the warps. Each time the player will be presented with a choice of two warps, make sure he takes the proper one each time. Take warps 1, 2, and 3 to be transported to the raised platform and hit the switches to open the door for the rest of the party, then take warp 4 to get off the raised platform and join them. Notice that when faced with the choices of warps, the pattern of warps 1, 2, and 3 is left, left, right. (It's handy to memorize "llr" for this area so you don't have to rely on the map when playing.)
After clearing the three rooms following the warp puzzle, proceed along the skinny room as shown on the map, running past the Popup Traps that shoot Foie. Hug the left side of the room as you run past to avoid getting hit. Three rooms later it's a good idea to ignore the Healing Ring as there's only one more room to go. Destroy the rocks and hit the revealed button to turn on the lights, and once the room is cleared you've finished Stage 7.